Setting up SplunkWeb with Third Party Certificates End-to-End on a Built Environment (Part 2)
Author: Laurence Everitt
Release Date: 29/05/2024
Introduction
This is the second part of a 3 part explanation of how to uplift SplunkWeb from presenting a regular HTTP website to using full-blown SSL/TLS HTTPS website, end-to-end. For further information, please see the other parts, Part 1: Overview and Part 3: Troubleshooting.
The Environment
For this guide, I have set up the following demo Splunk Enterprise system. It is not exhaustive, but does demonstrate the items that you will need to be aware of in most cases:
Also in this Blog Series...
Role(s) | Server FQDN | Machine Name |
|---|---|---|
Licence Master Cluster Master Search Head Deployer Deployment Server | manager.example.com | sa-vm-pool-05
|
Search Head Cluster
| shcluster.example.com
| sa-vm-pool-06
|
Indexer Cluster | idxcluster.example.com | sa-vm-pool-07
|
uf.example.com
| sa-vm-pool-08 |
NOTE: This small setup is PURELY for demonstration purposes. This Splunk system was created EXPRESSLY for this blog to provide the screenshots and to demonstrate a functional system in the smallest footprint possible. NEVER try to create such a system for production purposes - it is not in line with Splunk good practice; Splunk provides documentation on the instance colocation here. You have been warned - don’t try this at home.
This system is running Splunk 9.1.1 on 64-bit CentOS 7 and the encryption provider is an enterprise CA. I have chosen this combination of setups as:
• It is free to set up (including the 30-day Full Splunk Enterprise Splunk License) and
Many organisations have an enterprise CA provider.
• The system is set up with out-of-the box Splunk-to-Splunk encryption (using default Splunk HTTPS certificates) and SplunkWeb is running on HTTP (port 8000) and it is fully functioning.
The system is set up with out-of-the box Splunk-to-Splunk encryption (using default Splunk HTTPS certificates) and SplunkWeb is running on HTTP (port 8000) and it is fully functioning.
Splunk is installed in (and SPLUNK_HOME is set to) /opt/splunk or /opt/splunkforwarder on Enterprise or UF devices, respectively.
NOTE: Although I use the term “SSL” in the document (like many public documents), as the Secure Sockets Layer protocol has been deprecated, this document is actually referring to the subsequent standard of Transport Layer Security (TLS) protocol instead.
The Details
Certificate Signing Request and Key Creation
I created a small workspace on one of the management servers with the following statements. In this location, I can create all of the private keys and CSRs and then send them off to the CA.

Next, we need to set up the Subject Alternate Name (SAN) configuration which allows us to specify how to include both the DNS address of the server and the machine name. Generally, the reason for doing this is so you can refer to the server by the server name if needed. Also, in the case of a Search Head Cluster (where you may need a Network Load Balancer and therefore a separate URI for that, as opposed to the cluster members). This is done by copying the default Splunk configuration of openssl and then adding the SAN configuration to this:

Edit the openssl.cnf and add the following lines:

Next, we use the following command to run openssl to create the private key and the Certificate Signing Request file:

NOTES on this command:
• $SPLUNK_HOME/bin/splunk cmd - this is where we are executing the openssl in the Splunk shell. This ensures that we are using the version of openssl that Splunk is using and not another version that may be hidden in the operating system, so we are also consistent with Splunk 9.1.1.
• openssl is a very complex application, but it is the application of choice if you need to do anything with certificates on Linux (and can be found on Windows in Splunk or via another install, too). Don’t worry, give it the parameters it needs in the right format and it will do its thing.
• req - tells openssl to create a PKCS#10 Certificate Signing Request.
• -newkey rsa:2048 - tells openssl to generate a private key in the RSA format and with a 2048 byte length.
• -nodes - tells openssl to create the private key WITHOUT a passphrase. If you need to send the private key to another computer in an insecure way (such as email), then omit this command and then add the passphrase when the command runs. However, you will need to remove the passphrase for Splunk to use it later on.
• -keyout manager.key - tells openssl the name of the private key file to create.
• -out manager.csr - this command specifies the name of the CSR file to create.
• -subj /C=GB/O=COM/OU=example/CN=manager.example.com/L=Cirencester/ST=Gloucestershire/emailAddress=marketing@somerfordassociates.com - this is the Subject command, which describes to the CA the information about the certificate to identify it in a human-readable format. Different CAs will have different formats that they require and the format usually follows the style of one of two systems which will have been used to generate the CA - LDAP or Microsoft ActiveDirectory.
GOTCHA: The Subject value may bear no resemblance to the actual FQDN of the certificate - usually, in LDAP, the FQDN of “manager.example.com” would be expressed as “CN=manager,DC=example,DC=com”, however, this is not what we are specifying here. We are specifying a serial number of sorts that may be used to identify the certificate in the directory system and is different for each system - you will need to read the documentation for your CA for the full explanation of the requirements.
ADVICE: Use the -subj parameter, otherwise if this is omitted, the default configuration from the openssl.cnf file will ask for the settings. (And when you are doing this 5-10 times for a number of Splunk servers, this can result in mistakes.)
• -config openssl.cnf - This command tells openssl to explicitly use the given openssl configuration file (again, in case another configuration is hiding in the environment somewhere).
• -extensions SAN - tells openssl to use the SAN extension, which is a modification of the PKCS#10 CSR format that allows users to specify the Subject Alternate Name.
• -reqexts SAN - tells openssl to use the SAN extension as a part of the -extensions configuration.
You can check that the certificate signing request is generated correctly, by using this command:

NOTES on this command:
• req - this tells openssl that it is dealing with a certificate signing request.
• -text - this command prints out the certificate in human-readable text form.
• -noout - tells openssl not to output any of the encrypted information in the CSR.
• -verify - tells openssl to verify that the certificate has the right structure.
• -in - this is the filename of the CSR to check.
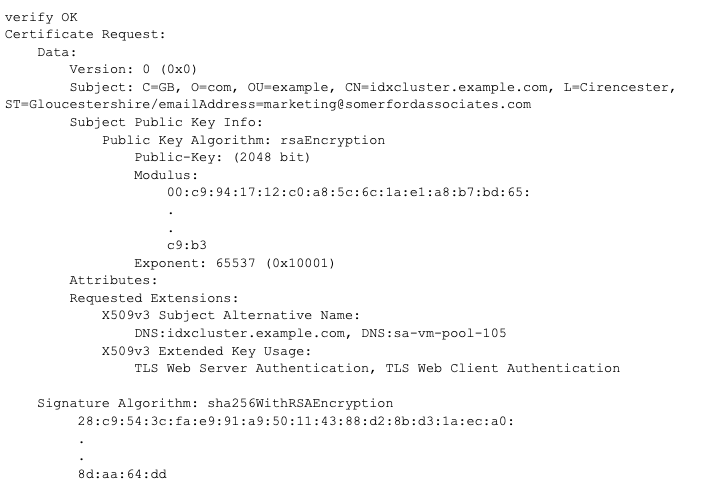
The desired output is something like this. If there are problems, check for issues such as out-of-date, mismatched or corrupted certificates:

Once you have generated your CSRs, submit them to the CA.
Getting the Certificate Authority’s Files to Work with Splunk
When the Certificate Authority sends you some files, they might work straight out of the box, but more often than not, they may need some massaging to work.
Introduction to Certificate Bundles
Certificate Authorities will provide you with a bundle of files which may include any or all of the following:
File | Purpose |
|---|---|
Certification Authority (CA) Certificate
| This is a certificate that is the top of the chain. Most operating systems (and browsers) will have this built into the system in the form of trusted root certificates. However, if Chrome or EDGE or Firefox do not already trust this certificate, because the CA is not public, for instance, then this will need to be added into the Trusted Root Certification Authorities store in the OS. Further information for this in Windows can be found here and for Linux (RedHat/CentOS) here.
However, in this case, as Splunk does not use the Windows/CentOS CA Stores, we need to construct our Splunk certificate bundle with this file as the root.
|
Intermediate Certificate(s) (possible)
| This certificate may be absent or present in the bundle, and in some cases it can be more than 1 certificate, depending upon how many organisations are involved in creating the chain of trust.
These certificates may need to be included in the Windows Intermediate Certification Authorities for the browser. Further information for this in Windows can be found here and for Linux (RedHat/CentOS) here.
With Splunk, as we need a full chain of trust, we need to make sure that these certificate(s) are present in the bundle if they exist. |
Server Certificate (possible) | This certificate is the end of the chain and will be unique to the server. This certificate is needed to identify to the remote server that it is the correct machine and that its private key is genuine. |
Private Key (possible) | Depending upon the Certification Authority, this file may or may not be provided in the bundle and it should match the private key that was sent to the CA (but may not be in the same format when returned).
If you still have the original Private Key file that was generated with the CSR, then you can ignore this file.
|
A combined .pfx/p12 file
(possible)
| This is a container file that usually includes a private key and one-or-more certificates. See section A Note on converting PKCS#12/PFX/P12 files for further information.
|
Further information on these types of certificates can be found here.
NOTE: Splunk requires the following item types:
• Private Keys must be in the RSA format.
• Certificates must use the x.509 public key certificate standard.
Check the Signed Certificates
The first thing to do when you have received your certificates is to make sure that they are correct and useful for Splunk (aside from format). Remember that a CSR is a Certificate Signing REQUEST. That means that the Certificate Authority can elect to fulfil that request in full or in part. What I have included in the instructions above is a request for all of the items that Splunk needs for a certificate to function fully. However, it is possible that the CA might not include all of the elements, such as not including TLS Web Server Authentication, TLS Web Client Authentication or the Subject Alternate Name, so this should be checked and verified on receipt and request for reissue, etc. To do this, use this command:

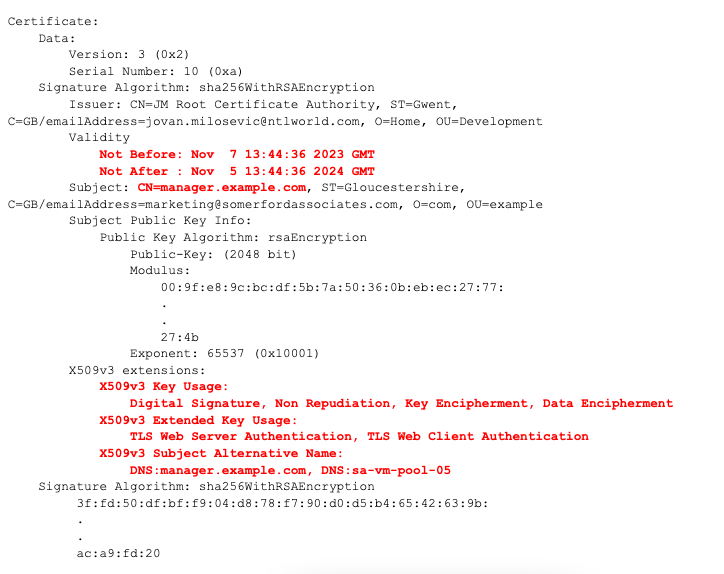
If you get the following output, then the certificate is in the x509 format, but then you need to check that the certificate is still as requested. Incorrect certificate content can be because of mistakes or policy, but the following content is required. I have coloured the vital items in red to verify:

NOTE: Certain browsers now do not allow long-term certificates - for example, Safari rejected a certificate with an expiry greater than 365 days in the future, and Google has announced that Chrome will be reducing the maximum certificate expiry period in the future, so keep this in mind.
Convert the Signed Certificates
A further wrinkle can be the file type of the received certificate(s). The CA will provide the files in various certificate file types, but they all need to be converted into the PEM format and combined into the right files for Splunk to use. Unfortunately, that can vary from being very easy - the files are all x.509 PEM files to being in PKCS#12 (PFX/P12), DER, CER or CRT or CERT format and requiring conversion of some type. Openssl is included in Splunk and it includes the ability to convert between different formats easily, such as the following commands:

Convert the Signed Certificates
NOTES for this command are:
• -in cert.cer - the input file name.
• -inform cer - the input file (CRT/CER/DER) format.
• -out cert.pem - the output file name.
• -outform pem - the output format (PEM in this case). he x.509 public key certificate standard.
A note on converting PKCS#12/PFX/P12 files
The PKCS#12 file format (extension of .pfx or .p12) is (for me) an overly-complex format. It can contain any number of items inside, but it is most commonly used for transferring a private key and a certificate or a complete certificate chain. More often than not, the certificates and key inside will be password protected, so these files will need to be extracted with that password. The OpenSSL command for extracting the private key is:

The OpenSSL command for extracting the certificate(s) is:

The OpenSSL command for decrypting (providing the password) the private key is:

In my case, the bundle I received from the CA included the following (showing only one server’s certificate set):
File Name | Type |
|---|---|
cacert2022.cer | Certification Authority (CA) Certificate in x509 CER file
|
manager.example.com.cer | Server Certificate in x509 CER file |
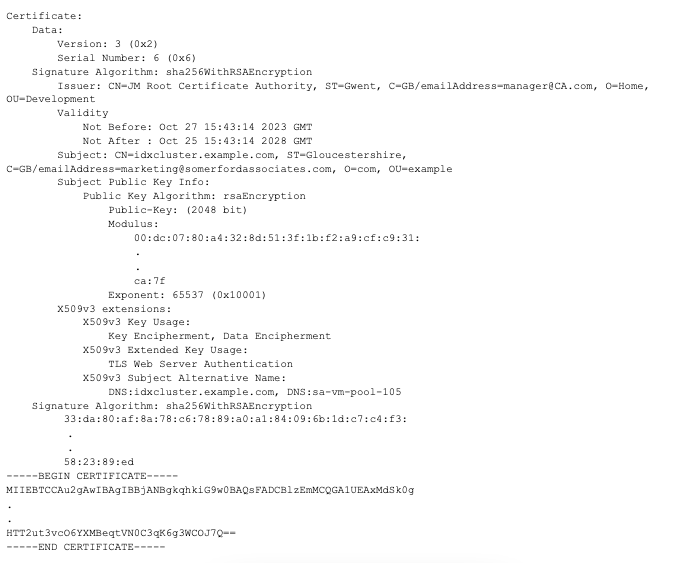
The curveball that I found in my case was that the server certificate was provided in an unusual format such as the below. This looks like my Certification Authority included the text element in the certificate file WITH the encoded part of the text.

To fix this, I edited the file to remove the unencrypted part of the certificate, so that it then looked like the following (with the BEGIN CERTIFICATE and END CERTIFICATE lines and the full contents of the encrypted data), similar to this:

From this, I ran openssl to convert the CER files into .pem files using the following command:

So I ended up with these files in the right formats, BUT in separate files, which is good, as we can create the files in the right formats:

So I ended up with these files in the right formats, BUT in separate files, which is good, as we can create the files in the right formats:
SplunkWeb - the file requirements
SplunkWeb requires one PEM file that contains the whole certificate chain in a particular order and the private key file.
SplunkWeb Certificate File Preparation
SplunkWeb requires one PEM file that contains the whole certificate chain in the order:
1. Server Certificate
2. (Any) Intermediate Certificates)
3. Root CA Certificate
NOTE: We do not include the private key file in the PEM file - that is kept in a separate key file.
Converting the files into the right format is easy - you can either open up the files and copy them to the final file or just use the following command:

NOTE: I named the .pem file after the server so that I can differentiate the file from other servers. When I come to apply this file to the server, I will rename it server.pem, so that I can configure each server the same way without changing the configuration in the Splunk app file.
CA Root Certificate Trust
Next, if the CA root certificate is not trusted by the client browsers, then it will need to be set as trusted in the client systems, so that the browser trusts it (and therefore that the instances of Splunk that present their certificates that were signed by the CA root certificate will be trusted as well.
Create a Certificate Bundle
In order to make the transfer of the certificates easy, we create a tarred gzip file with the following commands. Do this for each server:

NOTE: This certificate bundle is now very valuable and should be treated as such - do not move these keys anywhere other than where they need to go (i.e. the source and final destination, as if the key can be captured by a third party, that person could then impersonate the server with that key. In most cases, I DICTATE that key files are not moved from one machine to another, but that would mean having to generate the keys on the server that it will be deployed on and mean that the process would need to be run on each machine and in large environments, that can be cumbersome. However, in most environments, the keys can be moved around securely (using SCP in *NIX and encrypted ZIP on Windows), as most transfer methods are secure and they are moved within the same domain, but keep in mind the power of the keys and keep them safe.
SplunkWeb Certificate Deployment
Next, we need to configure Splunk to use the certificates for SplunkWeb communication:
1. Place the private key and certificate into a folder on the server,
2. Configure the web.conf in Splunk.
3. Restart Splunk.
4. Test SplunkWeb in a browser.
Placing the certificates and private key on the server
Create a folder for the server certificate and the private key and make sure that the Splunk user (Splunk’s executing user) only has access to this folder. I recommend creating a small script for this, so that all of the folders are consistent and then copy the private key and certificate .pem files to this folder:

Securing SplunkWeb with the new Certificate Set
The entries in the web.conf tell Splunk to use TLS, where to find the private key and certificate and what port to use when running with TLS.
The Splunk documentation for this is here, so on the server Operating System, go to the system local folder:

Create the web.conf file in this folder (or edit if already present) and add/edit the following lines:

NOTE: Once you have created the web.conf, make sure that this file is owned by the Spunk user with permissions to allow the user to at least read the file.
GOTCHA: SplunkWeb does not support passworded keys, which is why we strip the password from the key in this article.
GOTCHA: If you run Splunk as a non-root user, you will need to use a port above 1024, as in many versions of Linux, only root is allowed to listen on ports up to and including 1024 (you can blame SELinux for that). If you want to have users access Splunk on port 443, you will need to use Port Redirection in the Operating System Firewall (or another firewall) where appropriate.
Restart Splunk
Next, restart Splunk via the appropriate command. In the case of CentOS (and init.d), I use:

If the startup sequence hangs when it is checking for the existence of the SplunkWeb process, there is a problem with the configuration, so you should go back and check that all of the configuration is correct. As we have put everything into the etc/system/local and the etc/auth/certs folders within Splunk, this limits your search.
Test from a Browser
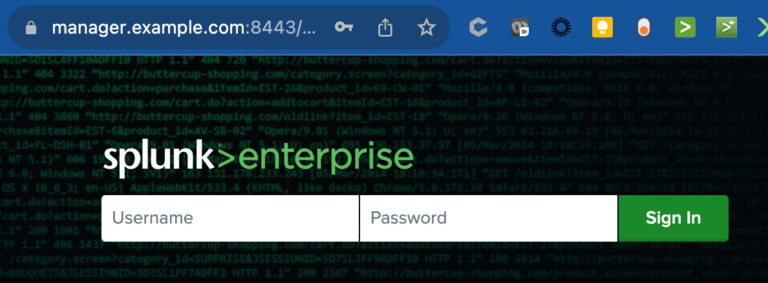
Splunk will start up and at this point, I can see that SplunkWeb is working and running over port 8443 with the SSL/TLS lock symbol.

NOTE: If Splunk starts, but SplunkWeb does not start up (i.e. the startup sequence hangs), then this will indicate there is a problem with the certificate or certificate chain. This can range from issues such as:
• The path in the web.conf being incorrect
• The .pem files with the wrong permissions/ownership
• The certificate .pem files being mismatched
• The certificate .pem files have the wrong structure/order/incomplete, etc.
• Private keys with passwords (which are not supported by Splunk 9.x)
In order to discover what the problem is, I recommend that you look for events which contain “ERROR” in the splunkd.log for clues after Splunk startup. I have also included a section at the end of this document with some useful openssl commands that you can use to check out certificates and fix the issues.
GOTCHA: After I had installed the CA certificate on the client that was running the browser, I needed to restart Chrome in order for it to recognise the new CA Certificate.
Rinse and Repeat for the Other SplunkWeb Servers
Okay, so now we have worked out the configurations for one server, let’s place this same configuration (with the correct customisations) on to the other SplunkWeb servers in the system/local folder.
NOTE: Remember that although this app will contain the configurations for the SplunkWeb certificates, we have not placed the certificates into etc/system/local and you will still need to copy over the correct certificates to each server as well.
Links Used in this Article:
https://docs.splunk.com/Documentation/Splunk/9.1.2/Deploy/Manageyourdeployment
https://smallstep.com/blog/if-openssl-were-a-gui/
https://learn.microsoft.com/en-us/skype-sdk/sdn/articles/installing-the-trusted-root-certificate
https://www.redhat.com/sysadmin/configure-ca-trust-list
https://www.ssl2buy.com/wiki/root-vs-intermediate-certificates
https://www.xolphin.com/support/Certificate_conversions/Convert_pfx_file_to_pem_file
https://knowledge.digicert.com/solution/how-to-convert-a-certificate-into-the-appropriate-format
https://en.wikipedia.org/wiki/PKCS_12#
https://docs.splunk.com/Documentation/Splunk/9.1.2/Security/SecureSplunkWebusingasignedcertificate
https://docs.splunk.com/Documentation/Splunk/9.1.2/Security/HowtoprepareyoursignedcertificatesforSplunk
https://acquia.my.site.com/s/article/360004119234-Verifying-the-validity-of-an-SSL-certificate


